


Post-installation steps
After having installed cfix, you will see the following folder structure:
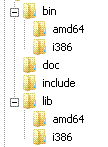
The bin folder contains the binaries, the ones of interest are cfix32
and cfix64. The binaries contain their
bit-ness in their name so that you can put both the i386 and the amd64 folder in your
PATH without getting
conflicts. The remaining folders should be self-explanatory.
The tutorial assumes that you plan to write tests with Visual Studio. In this case, it is advisable to first configure Visual Studio so that it automatically finds the required cfix files. The following paragraphs explain how.
![[Note]](images/note.png) | Note |
|---|---|
| Another option than configuring the VC++ directories is to make use of the %CFIX_HOME% environment variable: In your project, add $(CFIX_HOME)\include to as an Additional Include Directory and $(CFIX_HOME)\lib\i386 (or amd64, respectively) to the Additional Library Directories. |
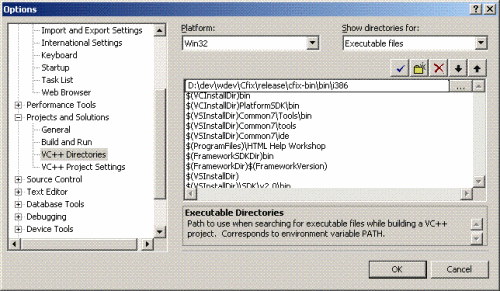
Start Visual Studio and open the Options dialog (Tools | Options). In the tree view on the left, navigate to 'Projects and Solutions' and finally 'C++ Directories'. There, add the appropriate cfix binary directories (bin\i386 for platform 'Win32', bin\amd64 for platform 'x64').
| Note |
|---|---|
| Rather than using absolute paths, you can use the $(CFIX_HOME) environment variable the installer sets by default. That is, use $(CFIX_HOME)\include, $(CFIX_HOME)\lib\i386 and $(CFIX_HOME)\bin\i386 to refer to the cfix include, library, and binary directory,respectively. |
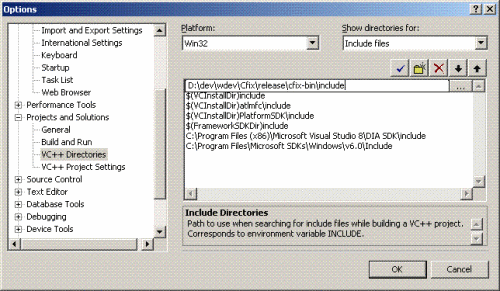
Now, select 'Include files' in the dropdown menu on the top right and add the cfix include directory to the list.
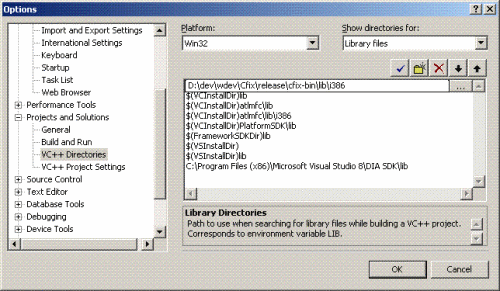
And finally, select 'Library files' in the dropdown menu on the top right
and add add the appropriate
cfix library directories (lib\i386 for platform 'Win32', lib\amd64 for platform 'x64').
That is all, we are ready to write our first test project.